How to use sub-zones in Kryptos?
Give part of an area its own coverage target and its own line in the results, by adding a custom risk grade named for the sub-zone.
5 min read
Some parts of an area need to be judged on their own: a wellhead bay, a turbine package, a launcher and receiver skid, or a corner where the project asks for a different coverage target from the rest of the deck. Mixed in with the rest of the area, a weak spot like that hides inside a good overall number.
In Kryptos, a sub-zone is simply a custom risk grade. You add a grade type named after the sub-zone, draw its volume, and Kryptos reports its coverage on its own row, next to Grade A, Grade B and the rest. The optimiser works towards its targets too, and it shows up separately in the summary, the Excel export and the report.
In this example, we add a sub-zone called Sub Zone A to a gas mapping that already has a Grade A over the whole deck.
Step 1: Add the grade type
Grade types are set once for the whole project.
- Open the Project Settings tab, then Risk Grade Types.
- Open the Gas Mapping or Fire Mapping tab, whichever the sub-zone is for. Gas and fire have their own lists.
- Click Add Risk Grade. A new row named Custom Grade 1 appears, already ticked as Enabled.
- Rename it after the sub-zone, such as
Sub Zone AorWellhead bay. This is the name you will see in the results and the report. - Enter its target coverage for each voting level, such as 1ooN and 2ooN. A target of 0 asks for nothing, so the optimiser will not try to cover it.
- Click Apply Changes.
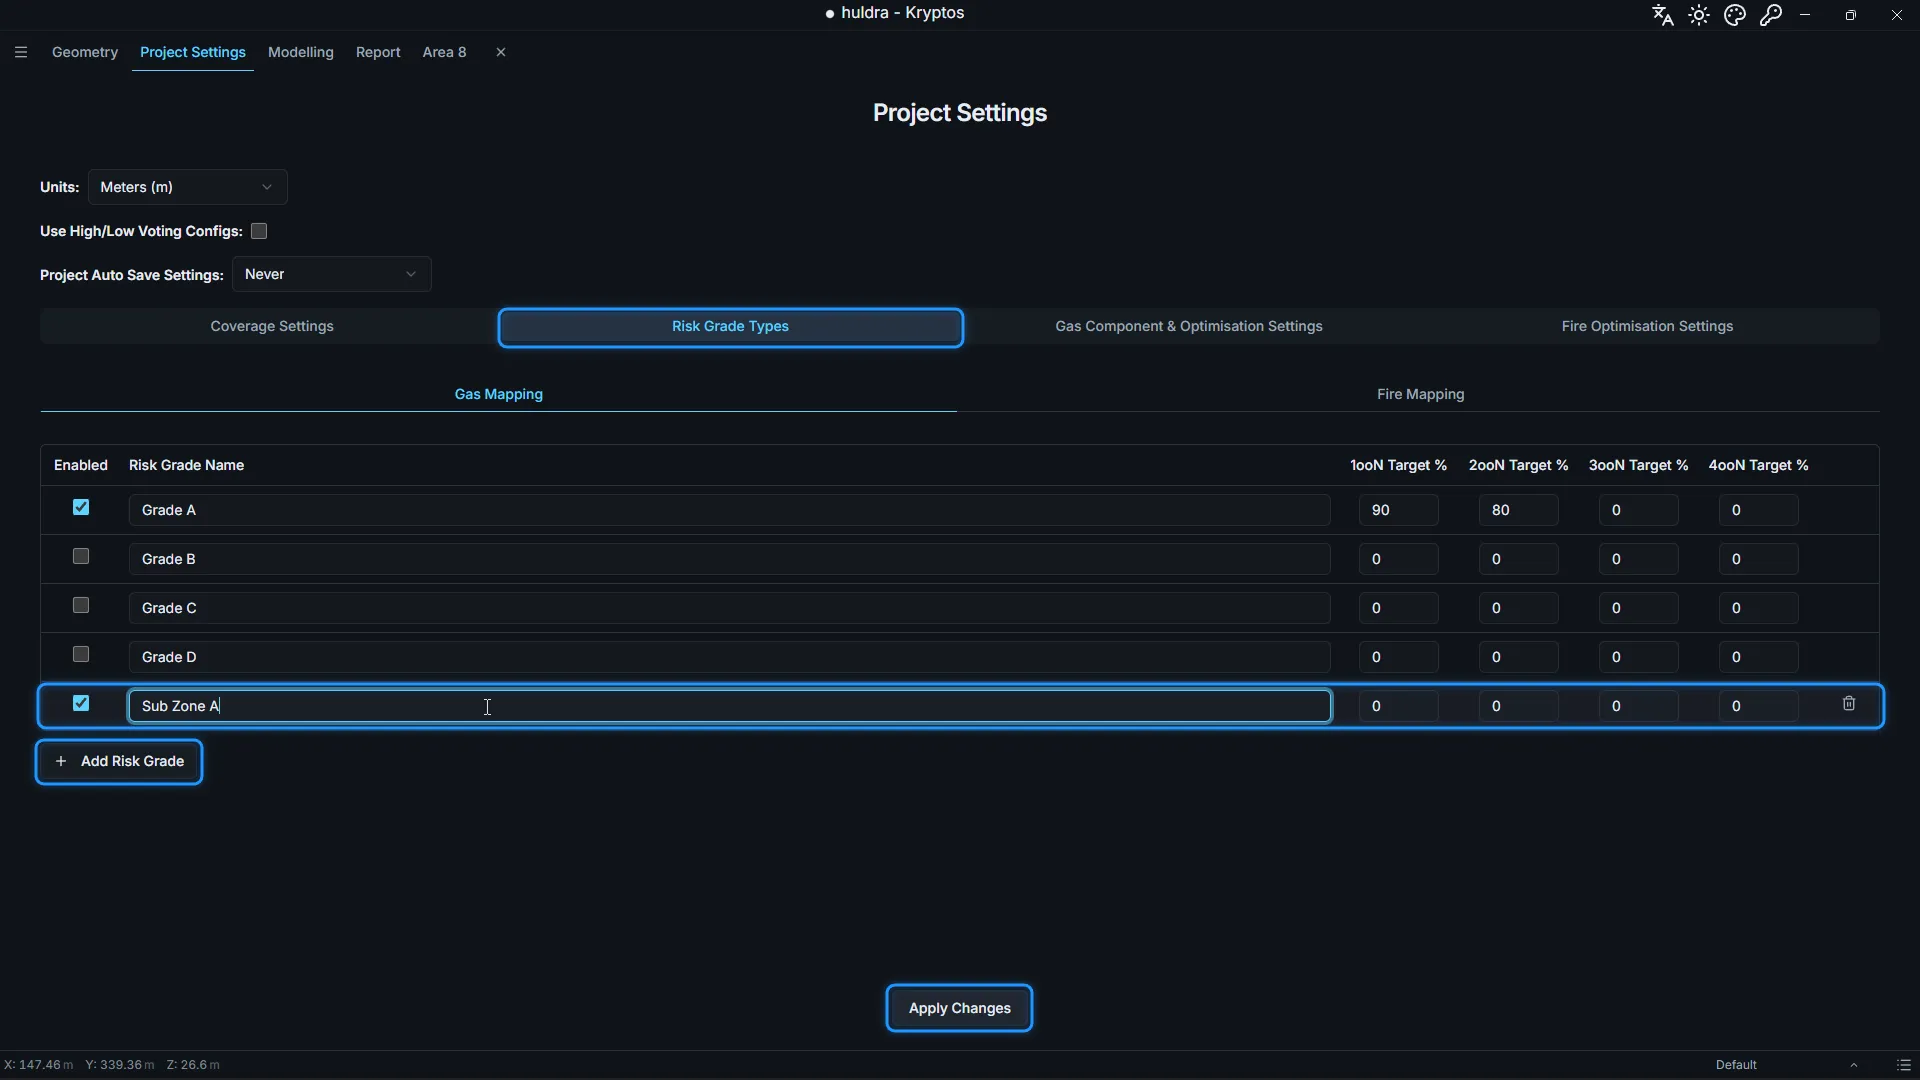
For more on grade types and targets, see Risk Grade Types in the Kryptos documentation.
Step 2: Set its size in the area
Every grade type needs a size in each area where it is used: the gas cloud size for gas, or the detection range for fire.
- Open the area and click Area Settings.
- For gas, open Gas Mapping Parameters. The new grade has its own column, Sub Zone A (m). Enter the gas cloud diameter for each gas. For fire, enter the detection range under Fire Mapping Parameters instead.
- Click Apply Changes.
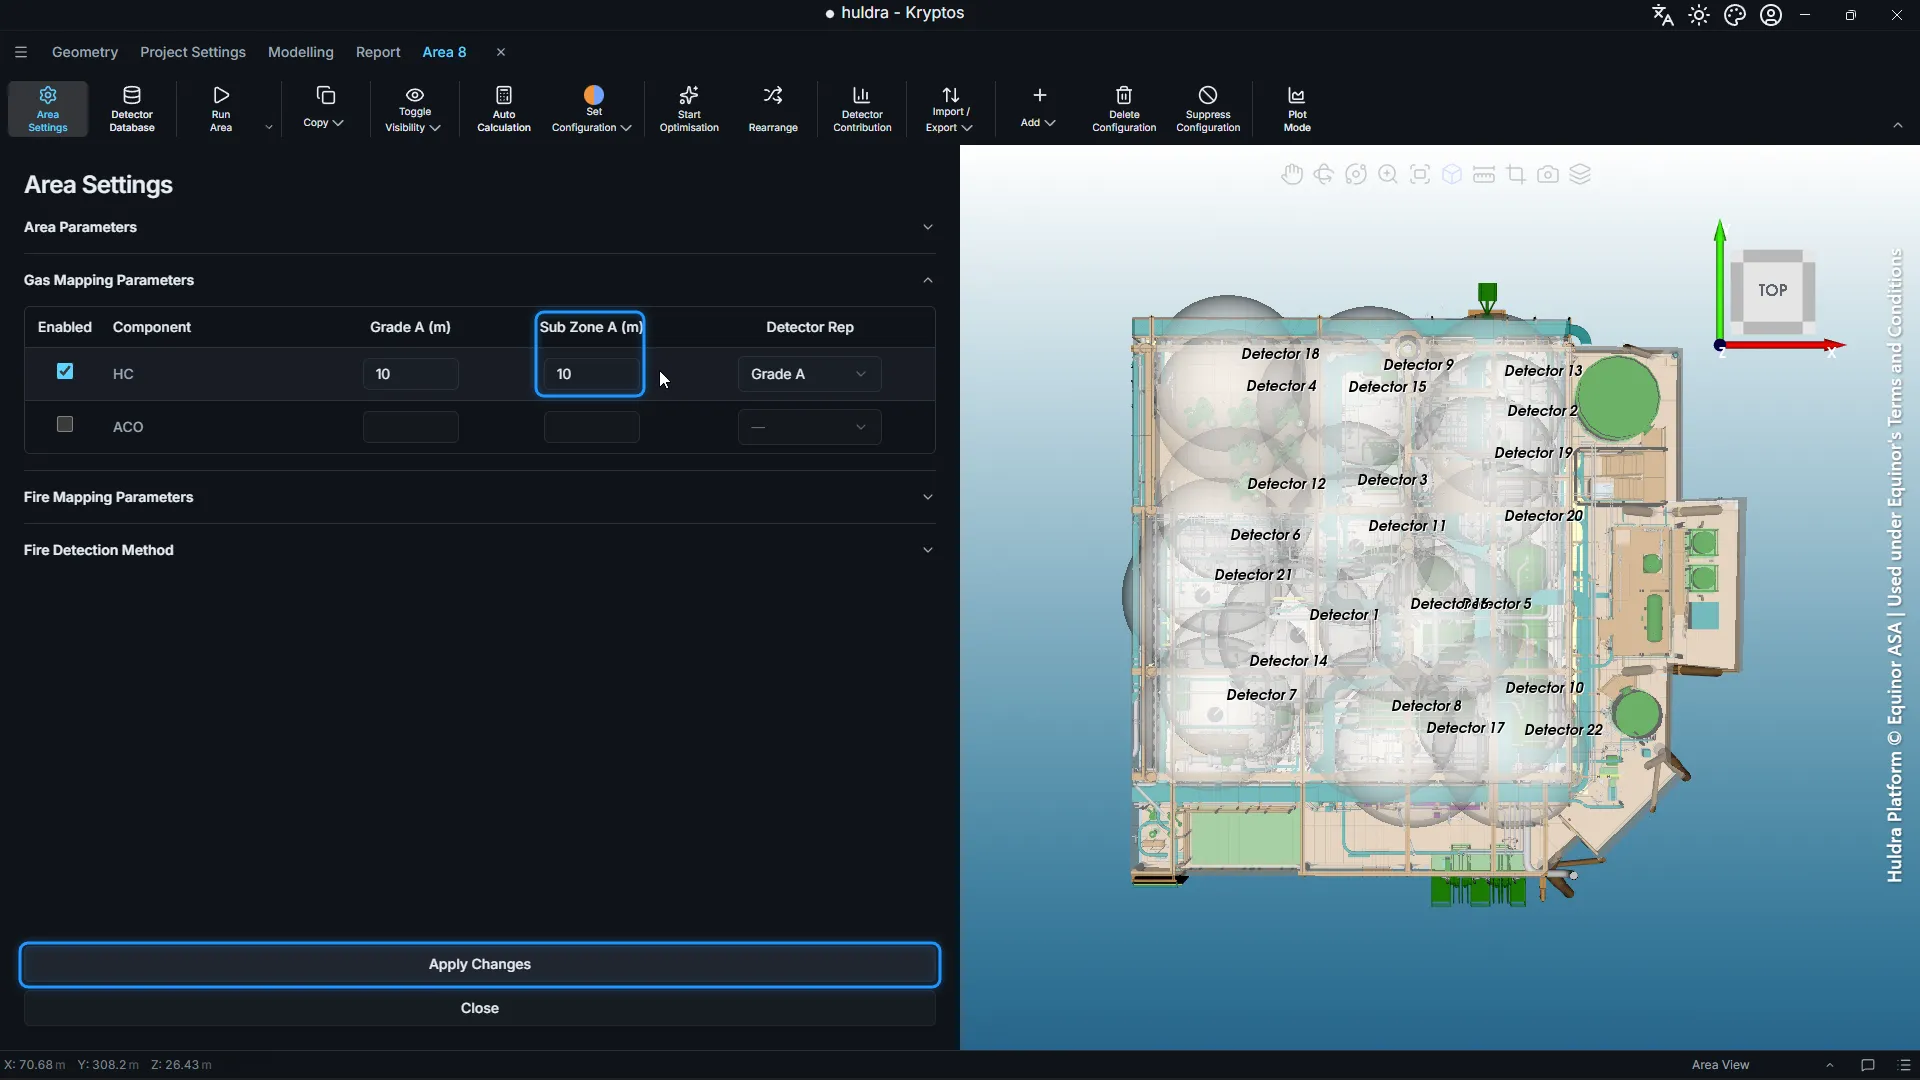
We used the same 10 m cloud as Grade A. A sub-zone can also have a smaller cloud, if the project asks for smaller leaks to be found there. For what each setting means, see Gas Mapping Parameters.
Step 3: Draw the sub-zone
- In the area tree, select Risk Grade under the mapping and click Add Grade in the ribbon.
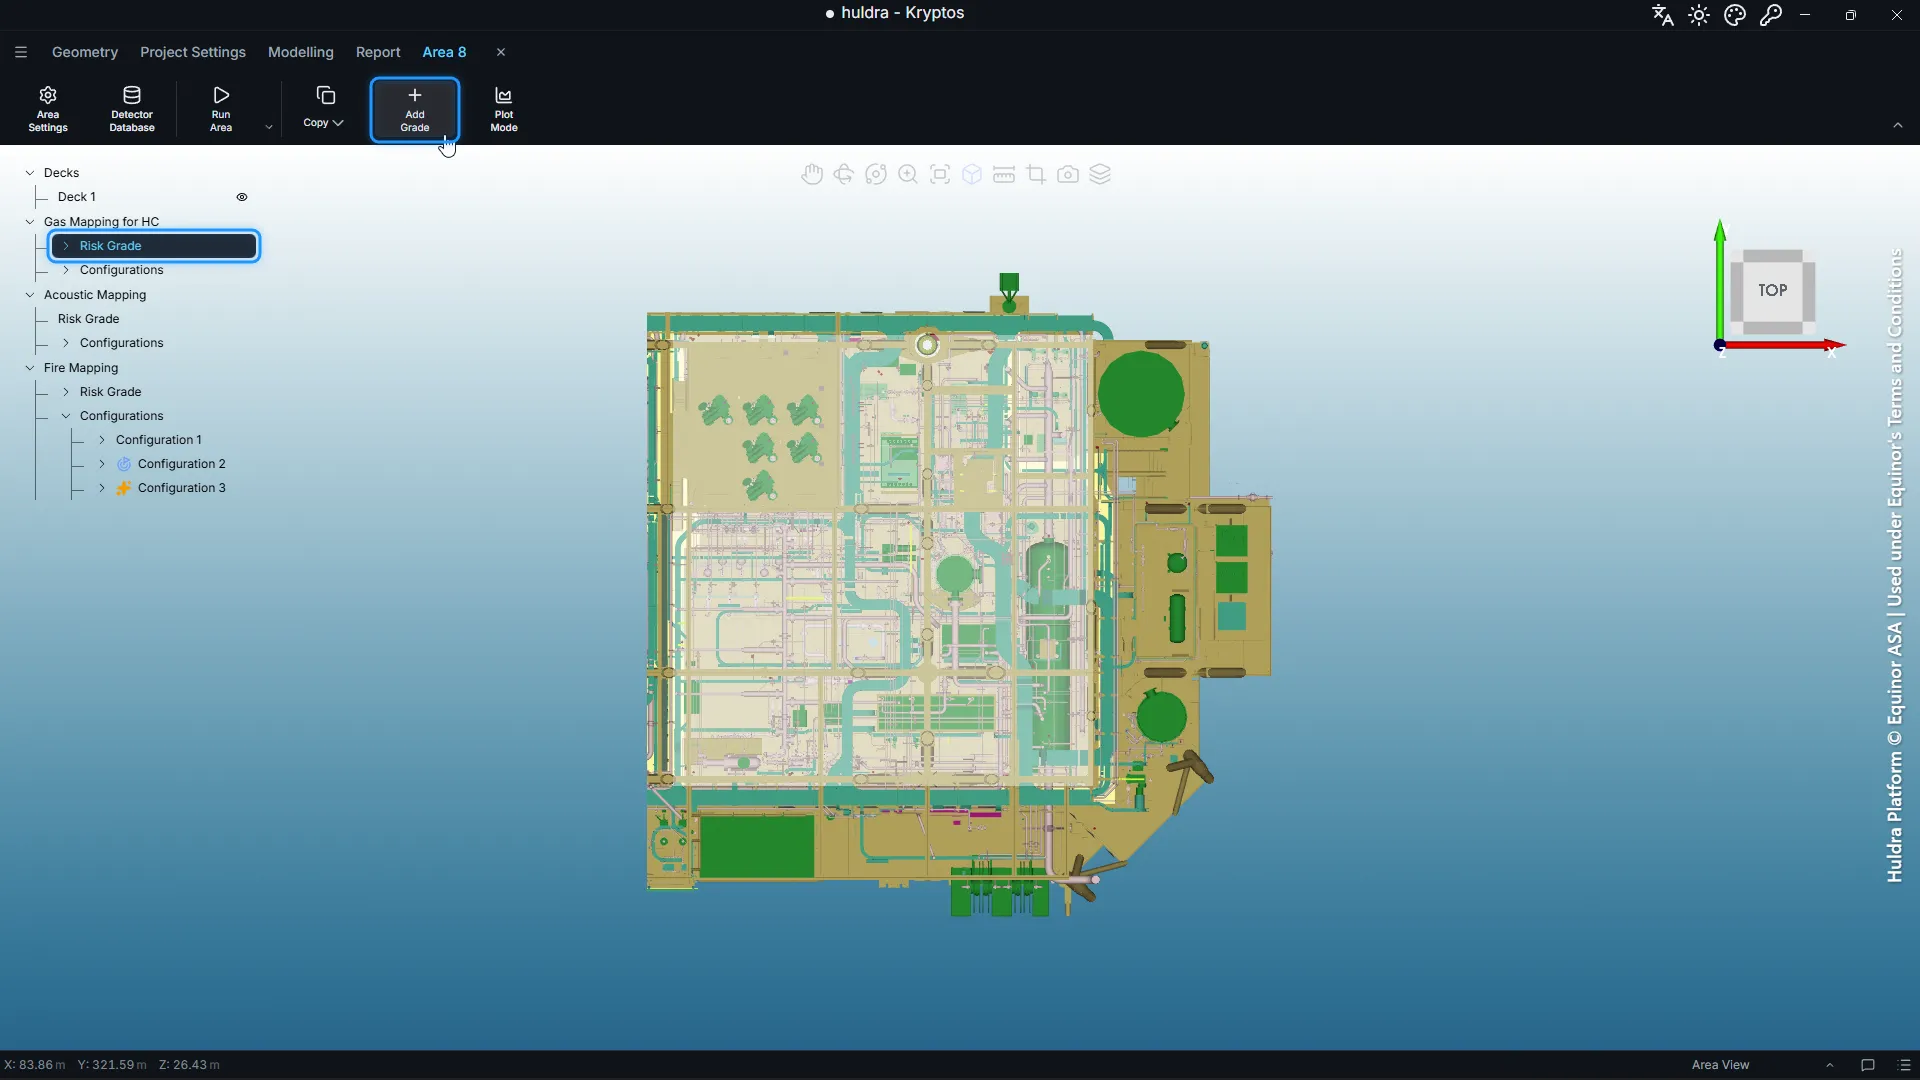
- Choose a shape, a draw plane and the extent, then click Draw Grade.
- Draw the outline of the sub-zone in the 3D view, around the equipment it covers, and click Complete.
If you have not drawn a grade before, the Risk Grades section of the Kryptos documentation walks through every shape, the drawing shortcuts and how to edit a grade afterwards.
Step 4: Make it the sub-zone
A new grade starts as the first grade type in the list, usually Grade A. Change it to the sub-zone.
- Select the new grade in the tree. Its panel opens at the bottom right of the 3D view.
- Open Grade Type and choose Sub Zone A.
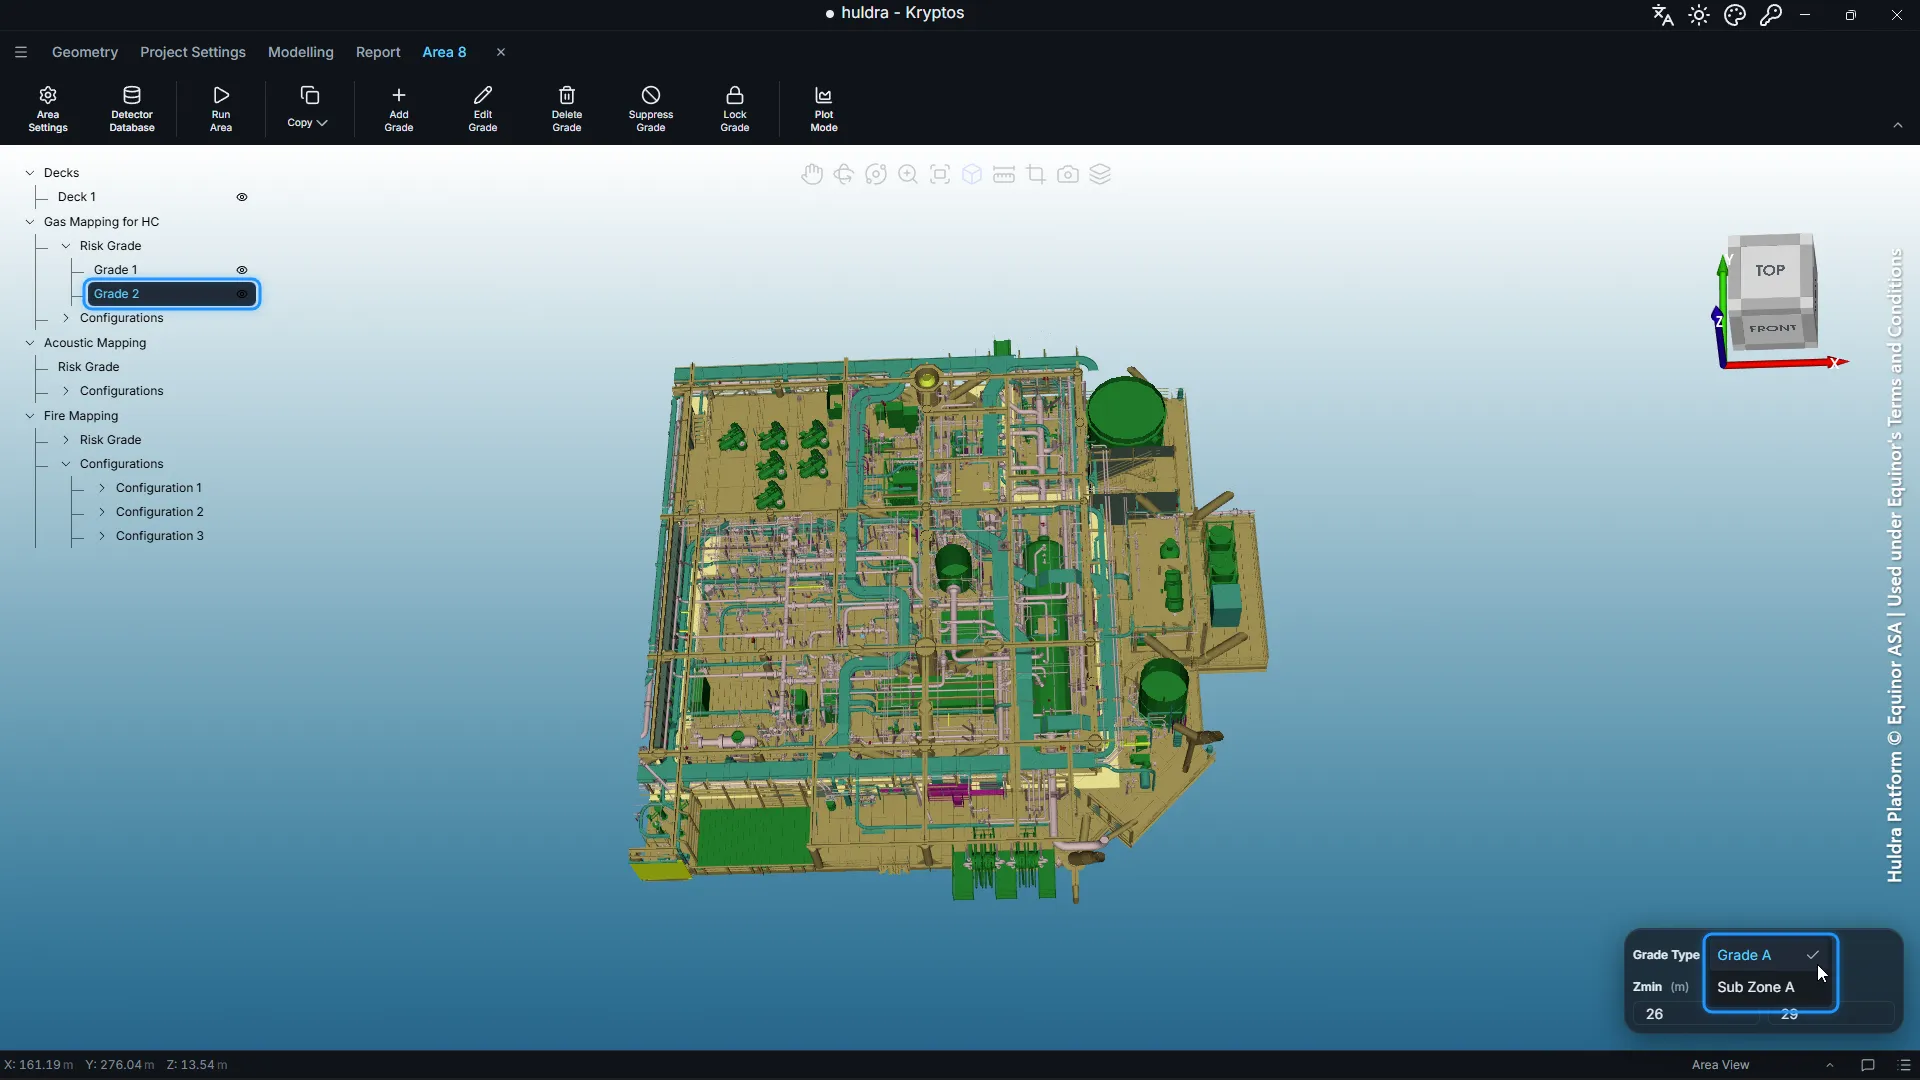
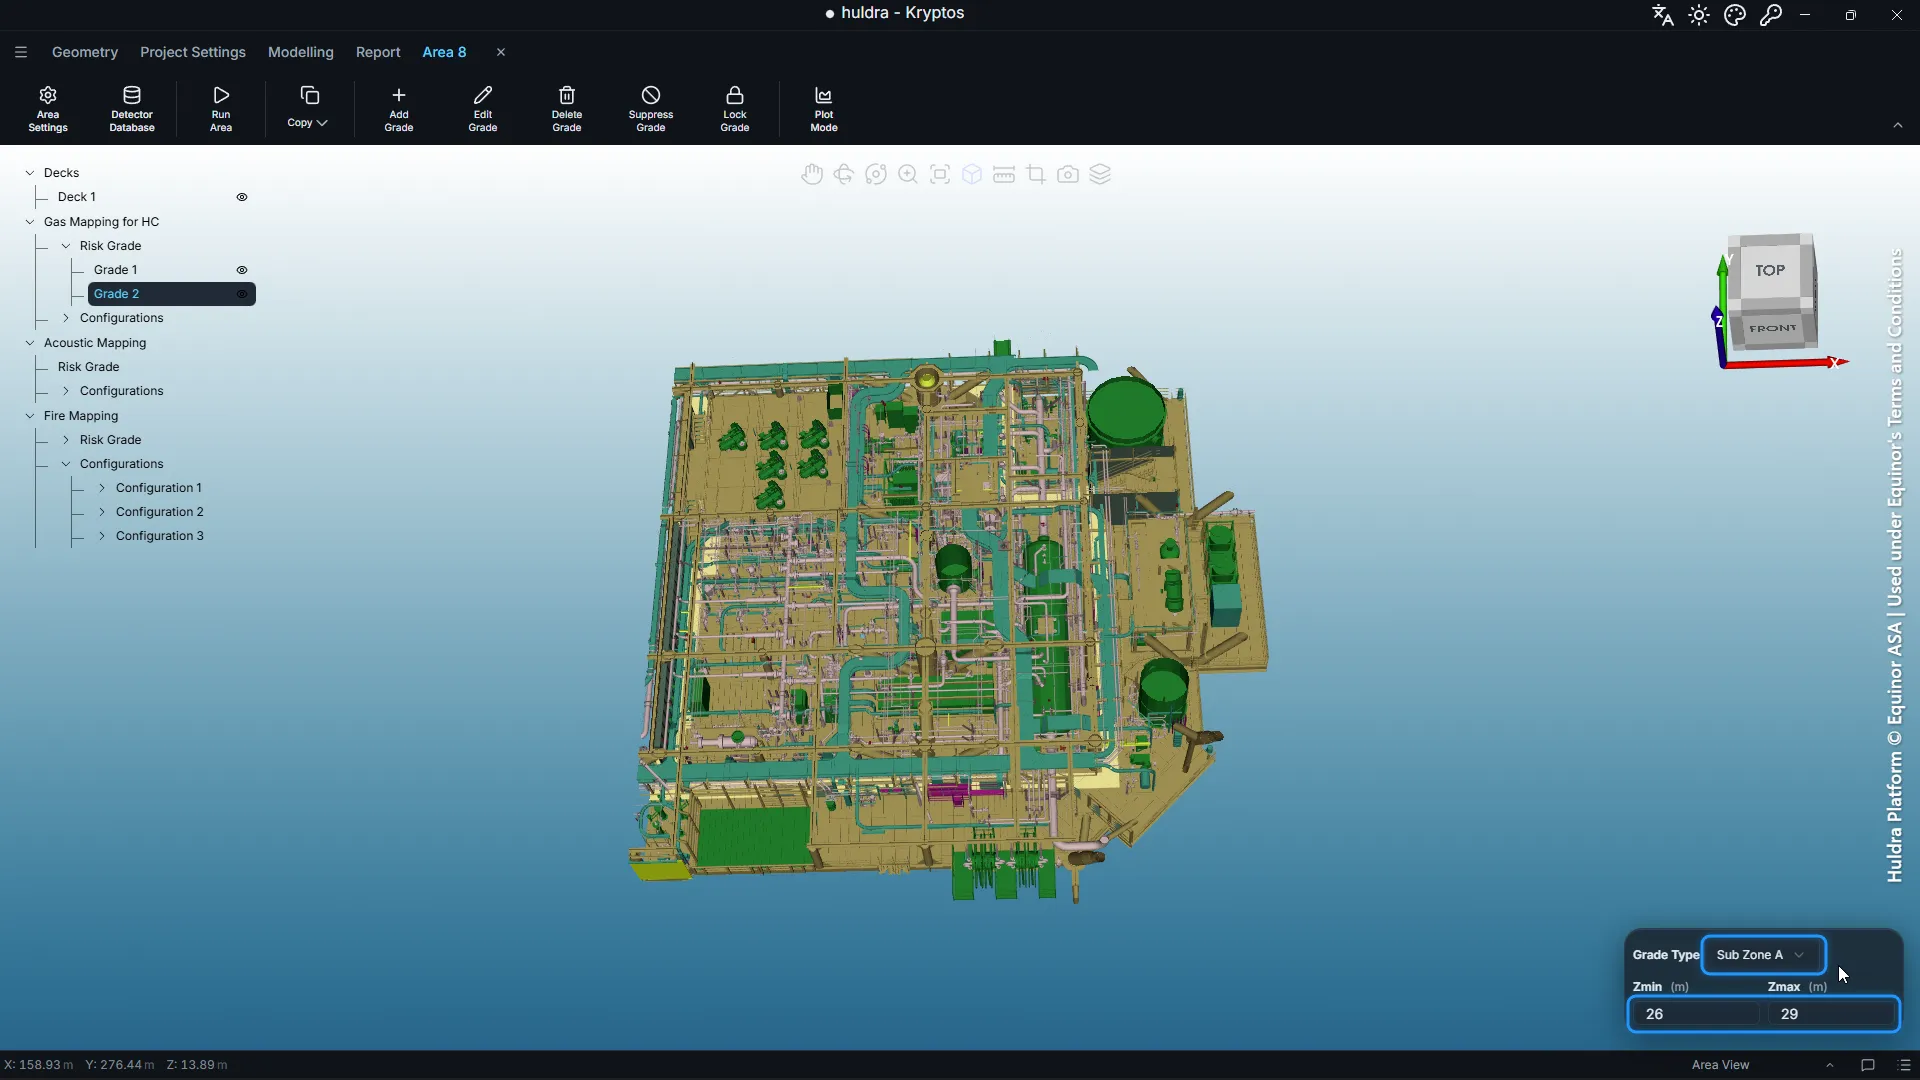
The same panel shows the grade’s coordinates, so you can type exact limits instead of dragging.
Step 5: Calculate and read the results
Select a configuration and click Run Area. The Voting Logic panel at the bottom left now has a column for Sub Zone A next to Grade A.
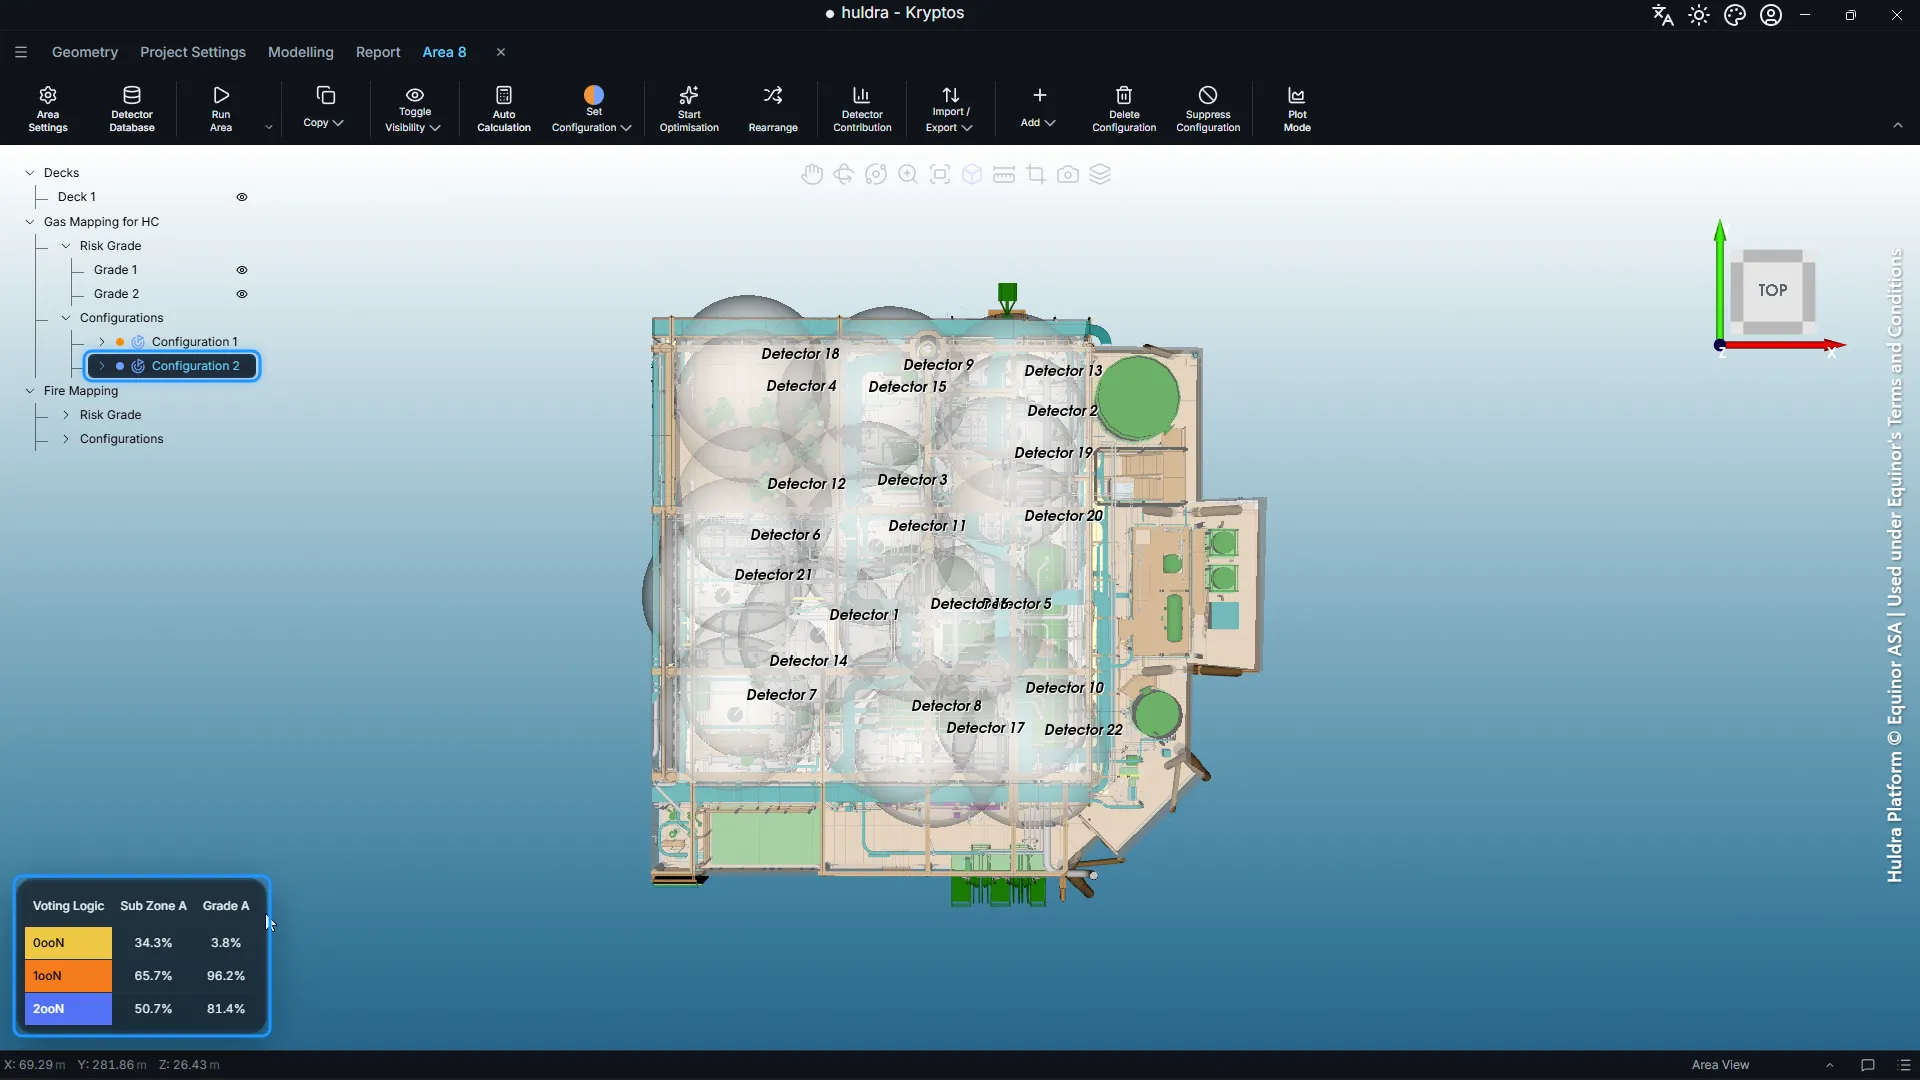
This is why sub-zones are worth the extra step. The layout here meets the Grade A targets across the deck, at 96.2% for 1ooN and 81.4% for 2ooN. But inside Sub Zone A, only 65.7% is seen by at least one detector, and a third of it (34.3%) by none. Measured with the whole deck, that gap would barely show.
To close it, set the sub-zone’s targets and run Start Optimisation on a configuration. The optimiser now works to meet the targets of every grade, the sub-zone included, and places detectors where the sub-zone needs them.
Tips
- One grade type per kind of sub-zone is enough. Every volume drawn with the same grade type is added up and reported together. Add a second grade type only when two sub-zones need different targets, or need to be reported apart.
- Each grade keeps its own numbers. Here, Sub Zone A was drawn on the same deck as Grade A, and each one reports its own coverage against its own targets.
- A grade type in use cannot be switched off or deleted. Change the volumes that use it to another grade type first. The four standard grades (Grade A to Grade D) can only be switched off, not deleted.
- Deleting a custom grade type also deletes what is stored against it, such as its gas cloud sizes, fire ranges and results. Kryptos lists what will go and asks before it deletes anything.
Credits and acknowledgements
The plant model in this post is the Huldra platform, © Equinor ASA, used under Equinor’s Terms and Conditions. Our thanks to Equinor for making the Huldra data openly available, which lets us show Kryptos working on a real offshore platform.
Every screenshot that shows the model carries this credit. Equinor has not reviewed or endorsed this post or Kryptos.
Model credit: Huldra Platform © Equinor ASA | Used under Equinor's Terms and Conditions